Salesforce User Interface: How to Add a New Lightning Application in your Salesforce Org
Looking for Salesforce Training & HandsOn Projects?
Trailblazer Profile | LinkedIn | Salesforce Blog | Facebook | Youtube Channel | WhatsApp Community
In this article, we
will discuss a no-code approach of adding a lightning app for our Salesforce
Org. This approach is helpful to launch any Salesforce Object (Standard or
Custom) as an application without using any code.
In the upcoming sections we will see the detailed steps to configure SObject to launch as a Lightning App.
Create a Custom Object ["Students"]
We can add a new
Custom Object “Students” as shown in the steps below-
Step-1: Click on “Object Manager”
Step-2: Click “Create” and select “Custom Object” to launch a “New Custom Object” screen

Step-3: Specify
Label for the object, let’s call it “Students”
Step-4: Select
“First Name” as a record identifier. This is just a demo so anything works just
fine but in a more sensible solution I would rather choose “Student Id” an
auto-generated number as a record identifier

Step-5: Select any
“Optional Feature” you deemed fit for the Object
Step-6: Select any
“Object Classification” feature as you deemed fit for the Object
Step-7: Click “Save”
to submit the changes

Step-8: Once the SObject is added successfully, we can see the details section of the newly created object
Step-9: We can see
the API name for this newly created object, this API name will be helpful when
we will write Apex code or other Declarative Solutions based on the “Students”
object

Add a new Tab for “Student” Object
We can add &
assign a new tab to the “Student” object as shown in steps below-
Step-10: Search for
“Tabs” in Setup
Step-11: Select
“Tabs” under “User Interface” navigation menu

Step-12: Under
“Custom Object Tabs” section, click “New” to add a new tab for “Students”
object

Step-13: Select the
object you want to assign a tab to, in this case, we will choose “Students”
object
Step-14: Click on
the “Search” icon to select a style from “Tab Style Selector” screen

Step-15: Choose a
suitable tab style from the “Tab Style Selector” and click “Next”

Step-16: Select all
the profile you want this Tab available for, for this demo, I keep the defaults
and click “Next”

Step-17: Select all
the custom apps you want this Tab available for, for this demo, I keep the
defaults and click “Next”

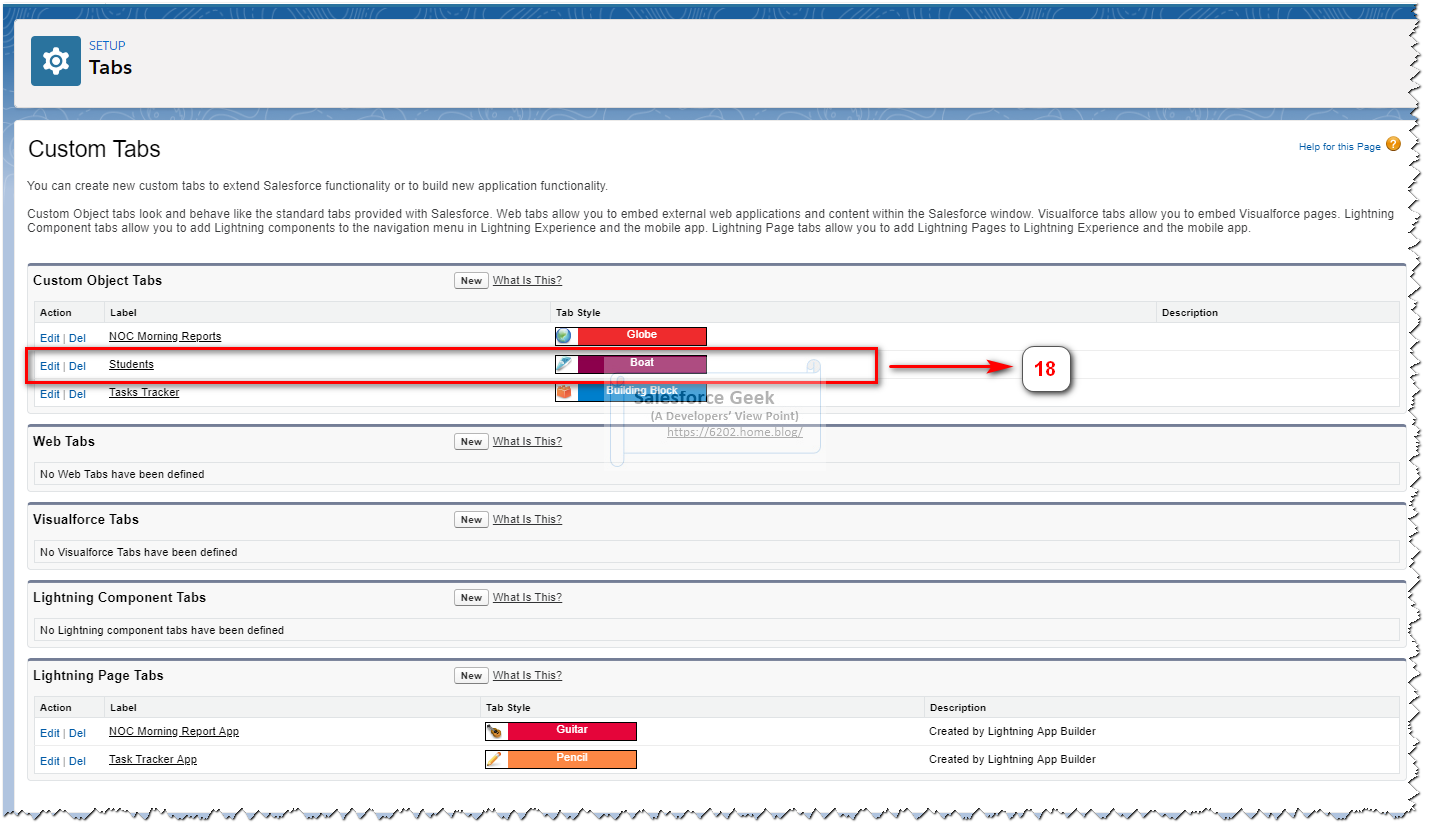
Step-18: Once the
Tab is added successfully, it will be displayed in “Custom Object Tabs”
Create a Lightning App for “Students” Object
We can add a new
Lightning App for the “Students” object as shown in the steps below-
Step-19: Search for
“App Man” in Setup
Step-20: Click on
“App Manager” under “Apps” navigation menu

Step-21: On the
“Lightning Experience App Manager” screen, click on the “New Lightning App”
button in the toolbar. This will launch the “App Details & Branding” screen

Step-22: Enter the
app name as “Students App”
Step-23: Enter the
developer name as “Student_App”, this will be helpful to refer the apps by API Name in
Apex & declarative solutions
Step-24: Enter
description as required
Step-25: Choose an
Image for your app
Step-26: Select the
color scheme as per branding directions from business
Step-27: Shows the
preview of the Application look & feel
Step-28: Click
“Next” to configure the options for the App

Step-29: Choose
Navigation options as required, I will keep the defaults for this demo
Step-30: Choose
Setup Experience options as required, I will keep the defaults for this demo
Step-31: Select the
require utility items for the App, Utility Items are reusable components that
can be used with any app. We can add or modify items associated with the
app later as well

Step-32: Click
“Next” to configure navigation items

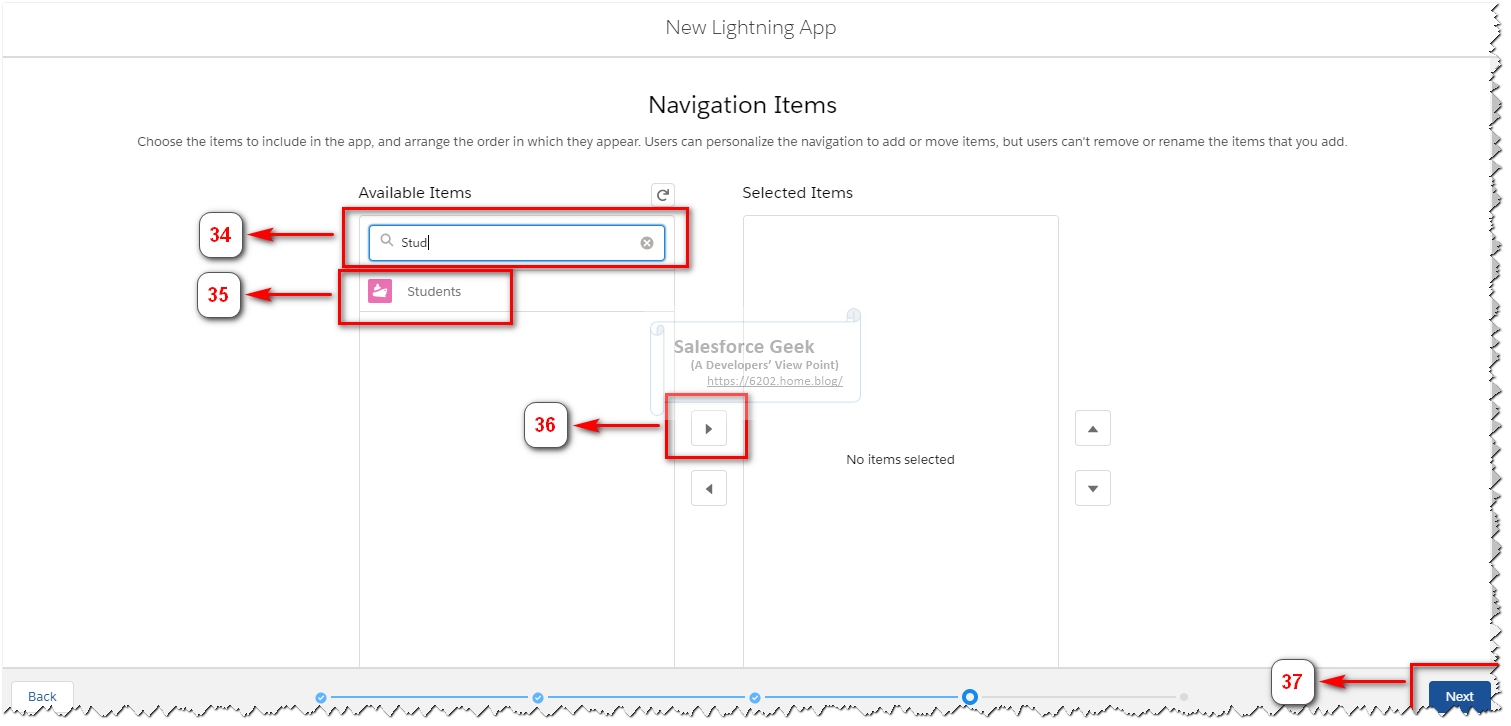
Step-34: Select the
require navigation items for the App, in this case, will search for “Students”
Tab
Step-35: Click
“Students”
Step-36: Add
“Students” Tab to the Selected Items section
Step-38: On the
“User Profiles” screen, choose the user profiles that can access this App. For
this demo, I want only system admins to have access to this app. Search for
“Sys” to locate for “System Administrator”
Step-39: Select
“System Administrator” profile that can have access to this app
Step-40: Click add
icon to move “System Administrator” profile to “Selected Profiles”
Step-41: Click “Save
& Finish” to finish configuring the App

Step-42: That is all
to create and set up the new app for “Students” Object. Now if go to “App
Launcher” screen
Step-43: We should
be able to see the “Students App” Icon

Step-44: When we
click on “Students App” Icon, it will take us to the ListView form of the
Student Object

Comments
Post a Comment